Creating a Basic Synth in XNA 4.0 - Part III

Hello! This is the third and final part of my Creating a Basic Synth in XNA 4.0 series. Don’t worry though, since I intend to write some more about this subject in the future, but since the topics I expect to cover will start getting more advanced, I’ll make them into a separate series.
In part II I’ve shown how to use the DynamicSoundEffectInstance class in order to to continuously play any single sound signal that we were capable of generating. I also wrote a separate article about oscillators (which you should also read if you haven’t done so already) which describes a simple class which takes care of generating some of the most common types of synthesized sounds.
Now it’s time to bring it all together and build a little interactive synthesizer that we can play like a piano on our keyboard keys! But for that, there are two major problems that we need to address:
- Polyphony - Being able to play more than one sound at the same time.
- Time - Being able to control where each note starts and stops.
This time I probably won’t be able to cover every bit of code used in the article, but you can download the sample source code at the end and hopefully it should fill any gaps.
Architecture
The architecture of the synthesizer I created for this article is divided into three classes or components. You can see them on the image below:
 The Building Blocks
What this diagram represents is that we’ll haves a Synth class with a bunch of Voice objects inside. You can think of a Voice object as being something that encapsulates a single individual sound, and provides some control over it. Unsurprisingly, the number of Voice objects created determine how many sounds the Synth can play at the same time, or in other words its polyphony.
As for generating the sound itself, the Voice object delegates that task to the Oscillator class that I already discussed. In this case, there will be a single Oscillator shared by all voices, which means that every key we press will be making the same type of sound (but at different frequencies).
So, how do we solve the problems of polyphony and time control using this architecture? Simple!
- In regards to implementing polyphony, what happens is that the Synth class keep a list with all the Voices that are currently being played, and anytime it needs to submit a new audio buffer, it iterates over all active voices passing each of them the same audio buffer. Then it’s up to the Voices to do their own processing on that buffer. The catch is that, unlike what we did in part II, instead of overwriting the buffer with new values, these values will be added to the values that are already there, which effectively mixes all sounds the together!
- As for having some control over time I’ve just mentioned that all the notes that are playing are put on an active voices list. Because of that, controlling when a note starts or stops is pretty easy! To start a note, just create a Voice and add it to the active voices list. To stop a note, just get the Voice that is associated with it and remove it from the active voices list. In order to allow a Voice to kill itself from inside, I added a boolean IsAlive property to my voices, and when iterating over them on my Synth class, I remove any voice that is already dead from the list. Voila!
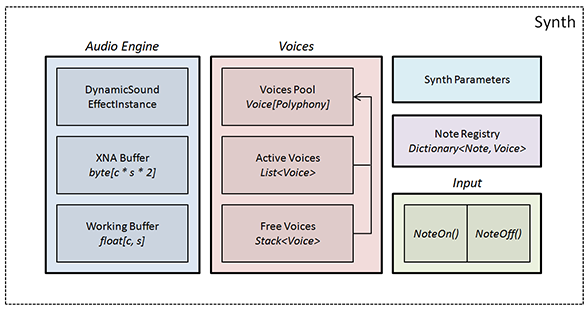
The Synth class deserves some special attention because of all the different things it will be doing. Let’s start with an image of its internals:
 Synth Architecture
The Audio Engine bit is exactly what was described in part II of the series. It creates a DynamicSoundEffectInstance object plus a couple of buffers, and links everything together, taking care of submiting a new audio buffer when needed. The only big difference is that here the audio engine will loop over all active voices and delegate the task of modifying the audio buffers to them.
The Voices section is responsible for managing all the voices. It uses three different data structures for this:
- Pool of Voices - An array of size Polyphony containing all the voices that will be used by the synthesizer. These will be created when the synthesizer is initialized, and remain constant until the end.
- Active Voices - A list where we store references to all of the voices that are currently playing. This list is picked up by the audio engine and determines which notes we’ll be hearing.
- Free Voices - A stack which will be used to quickly get a voice that is not being used when we ask the synthesizer to play a new note.
Interaction with the synthesizer is done through two methods named NoteOn and NoteOff. The NoteOn method fetches a free voice, initializes it with the frequency corresponding to the note we want to play, and adds it to the active voices list. The NoteOff method simply tells the voice corresponding to that particular note to stop playing.
For this we also need the Note Registry which is a simple dictionary that keeps a connection between each playing note and its respective voice object.
Okay, enough of the architecture. I’ll jump straight into some code now. I’ll try to cover the most important bits, but download the source code at the end of the article and play around with it.
Step 1: The Oscillator Class
I’ll start with the simplest step which is generating the audio signal. I’ve already talked about this subject before. Basically we’ll create a class called Oscillator whose sole purpose is to generate audio signals of different types.
But in comparison with the Oscillator class I described earlier, I made a few modifications this time to make it a bit easier to understand:
- I changed it into a static class with separate methods for each type of wave. Now you don’t even need to create an Oscillator. Instead you only need to call the right method and you’re good to go.
- I also changed the signature of the main function a bit. This time our oscillator will depend on two different parameters (frequency and time) while the signal’s maximum amplitude will remain fixed to 1. Any changes to the signal’s amplitude will come later from our synth.
Here’s the code:
public static class Oscillator
{
    public static float Sine(float frequency, float time)
    {
        return (float) Math.Sin(frequency * time * 2 * Math.PI);
    }

    public static float Square(float frequency, float time)
    {
        return Sine(frequency, time) >= 0 ? 1.0f : -1.0f;
    }

    public static float Sawtooth(float frequency, float time)
    {
        return (float) (2 * (time * frequency - Math.Floor(time * frequency + 0.5)));
    }

    public static float Triangle(float frequency, float time)
    {
        return Math.Abs(Sawtooth(frequency, time)) * 2.0f - 1.0f;
    }
}

public delegate float OscillatorDelegate(float frequency, float time);
You may have noticed that I also declared a delegate with the same signature as these methods. This will be useful to store a reference to one of the oscillator methods, and being able to change them on the fly on my synth class. That’s all for this part, and with this we’ve got the four most common sound waveforms covered. Let’s move to step two then.
Step 2: The Voice Class
Next I’ll be talking about the Voice class. I’ll start with the public interface of the Voice class, and what each of its methods need to do. The comments should be self-explanatory:
// Returns true if voice is still playing, false if it has ended.
bool IsAlive { get; }

// Starts the voice using the chosen frequency
void Start(float frequency);

// Stops voice playback
void Stop();

// Add contribution to the buffer
void Process(float[,] buffer);
Implementing it is not too hard. The Voice class keeps a reference to the parent synth class which is used to access the shared oscillator. Calling Stop will make the voice stop immediatly by setting the IsAlive property to false. The only part that might not be too obvious, is why I multiply the sample by 0.3f before adding it to the buffer. I do so in order to lower its volume a bit and prevent the resulting values to start saturating with just a couple of notes pressed. Still, if you try to play too many notes at the same time, you’re bound to run into distortion problems, unless you start using a more intricate mixing algorithm (instead of just adding the samples together).
public class Voice
{
    public Voice(Synth synth)
    {
        _synth = synth;
    }

    public bool IsAlive { get; private set; }

    public void Start(float frequency)
    {
        _frequency = frequency;
        _time = 0.0f;
        IsAlive = true;
    }

    public void Stop()
    {
        IsAlive = false;
    }

    public void Process(float[,] buffer)
    {
        if (IsAlive)
        {
            int samplesPerBuffer = buffer.GetLength(1);
            for (int i = 0; i < samplesPerBuffer; i++)
            {
                float sample = _synth.Oscillator(_frequency, _time);
                // Important: Use += instead of = !
                buffer[0, i] += sample * 0.3f;
                _time += 1.0f / Synth.SampleRate;
            }
        }
    }

    private float _frequency;
    private float _time;
    private readonly Synth _synth;
}
At the end of this article I’ll show an upgraded version of the Voice class which allows you to add a simple fade-in/fade-out to your voices which gets rid of a few annoying sound problems and makes everything sound better. But for now I’ll move on to the Synth class.
Step 3: The Synth Class
A large part of the Synth class is the low-level audio engine management that I’ve described in part II, so I’ll skip right over those and only talk about the significant changes.
To start with, there’s the four data structures that are used to manage all of the voices. They’re all initialized in the constructor of the class. First, we create an array of voices (sized Polyphony) which will be our voice pool. This is the only point in our application where we will be instantiating Voice objects - after that it’s just references to existing objects being moved around. Next is the stack of free voices, which initially contains all of the voices in the pool. Then there’s a list of active voices, which starts out empty, and is used to keep all the voices that are playing at any given moment. Finally we keep a dictionary linking notes (which in this sample will be an integer value with 0 corresponding to C4, and moving up and down in semi-tones) to the voices they correspond to. This is necessary when we tell the synth to stop playing a note, so that it can delegate the order to the appropriate voice.
public const int Polyphony = 32;
private readonly Voice[] _voicePool;
private readonly List<Voice> _activeVoices;
private readonly Stack<Voice> _freeVoices;
private readonly Dictionary<int, Voice> _noteRegistry;

// On Constructor
_voicePool = new Voice[Polyphony];
for (int i = 0; i < Polyphony; ++i)
{
    _voicePool[i] = new Voice(this);
}
_freeVoices = new Stack<Voice>(_voicePool);
_activeVoices = new List<Voice>();
_noteRegistry = new Dictionary<int, Voice>();
Next in line is our SubmitBuffer method (once again see part II for clarifications). The first big difference is that we need to clear the buffer (fill it completely with zeros) at the top of each submission. This is necessary because our voices won’t be overwriting the buffer like we before but rather adding their values on top of the existing buffer, so wee need an empty plate to start with (think of it as calling the GraphicsDevice.Clear method for graphics). I’ve gone and moved the ConvertBuffer method into a static helper class, but its contents are still the same as before.
private void SubmitBuffer()
{
    ClearWorkingBuffer(); // Fill buffer with zeros
    FillWorkingBuffer();
    SoundHelper.ConvertBuffer(_workingBuffer, _xnaBuffer); // Same method used in part II
    _instance.SubmitBuffer(_xnaBuffer);
}
Where most of the magic starts is inside the FillWorkingBuffer method. Whereas we used to directly write to the buffer inside of that method, now the only thing it does is iterate over all the active voices, calling Process on them, and removing any dead voices at the end of it. Notice how I iterate over the voices in reverse order, in order to be able to remove them without invalidating my for-index.
private void FillWorkingBuffer()
{
    for (int i = _activeVoices.Count - 1; i >= 0; --i)
    {
        Voice voice = _activeVoices[i];
        voice.Process(_workingBuffer);

        if (!voice.IsAlive)
        {
            _activeVoices.RemoveAt(i);
            _freeVoices.Push(voice);
        }
    }
}
And finally we have the two methods that provide interactivity to the synthesizer, NoteOn and NoteOff. When calling NoteOn, the first thing it does is check the note registry to ensure that note is not already registered. If everything goes well, it tries to fetch a free voice from the top of the stack, registers that voice to the current note, initializes the voice with the appropriate frequency, and finally adds it to the active voices list. The SoundHelper.NoteToFrequency method is used to calculate the right frequency for each musical note (with 0 corresponding to C4 and so forth). Check the source code at the end for the implementation.
public void NoteOn(int note)
{
    if (_noteRegistry.ContainsKey(note))
    {
        return;
    }

    Voice freeVoice = GetFreeVoice();

    if (freeVoice == null)
    {
        return;
    }

    _noteRegistry[note] = freeVoice;

    freeVoice.Start(SoundHelper.NoteToFrequency(note));

    _activeVoices.Add(freeVoice);
}
As for stopping a note, it’s a matter of checking the note registry to see if it exists, stopping the corresponding voice and removing the note from the registry.
public void NoteOff(int note)
{
    Voice voice;
    if(_noteRegistry.TryGetValue(note, out voice))
    {
        voice.Stop();
        _noteRegistry.Remove(note);
    }
}
You could stop by now, and you’d have a simple synthesizer ready to be played. All you’d have to do is link each NoteOn and NoteOff call with your keyboard’s KeyDown and KeyUp events and you’d be set. But if you do that, you might notice an annoying little “pop” sound when starting or stopping each note. Keep reading to see how this can be solved.
Optional Step 4: Adding Fade-In and Fade-Out
There’s a problem with abruptly starting or stopping a sound: the sudden loss in amplitude of the signal can easily create a noticeable “pop” sound that ruins the whole experience. You can hear that in the video sample at the end of the article, whenever I disable the fade mechanism.
In order to prevent this, I’m going to modify the Voice class a bit in order to add a controllable fade-in and fade-out period to the sounds. Fading a sound basically means multiplying the value of the sample you generated by a floating point number between 0 and 1. So you need to find a way to start this floating point number at 0, move it until it reaches 1, and then do the opposite motion at the end of the sound.
What surprised me the most about this is that even if the fade duration is really small (like 5ms, which is so small you probably won’t even notice a difference), it will still be enough to get rid of those unwanted noises! Here’s a list of all the changes I did, but check the source code archive at the end for the actual implementation.
Changes to the Voice class:
- Added FadeInDuration/FadeOutDuration integer variables to my synth which describe the duration of each these phases in samples (so if your sample rate is 44100, then a duration of 44100 will be equivalent to one second).
- Added three different states to the Voice class: Attack (Fade-In), Sustain (Normal) and Release (Fade-Out). I’ll mention why I chose those names below.
- Doing Start() now moves to the Attack state if FadeInDuration is not zero.
- Doing Stop() doesn’t kill the Voice immediatly, but rather changes to the Release state (unless FadeOutDuration is zero).
- Use a counter inside Process to keep track of time and calculate the correct fading factor (between 0 and 1).
- Multiply the sample generated by the fading factor to modify it.
- Killing the Voice is now done inside Process when the Release state ends.
This is actually one of the subjects I want to treat in more detail in a later article. What we’re doing is basically modifying the volume or amplitude of our signal over time. This is something usually referred to as an envelope or ADSR envelope. The names I chose (Attack, Sustain and Release) are related to that subject too! But for now just think of them as being simple fade operations.
Doing these changes has a few interesting implications in our synth. The graphics below describe in general terms how the volume of our sounds vary with time, and help correlate them with the NoteOn and NoteOff commands that we issue. Initially, before adding fading to our Voice class, what we had was something like this:
 Without Attack/Release
Each voice was alive only during the time between our NoteOn and NoteOff, and the changes in volume were abrupt. Now with these changes, we have something like this instead:
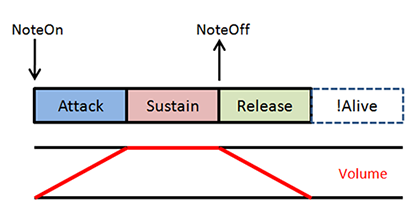 With Attack/Release
See how the note remains alive for a bit even after the NoteOff command? And finally, there’s a special case I’d like to talk about. What happens if your NoteOff command happens before the attack phase ends? In that case we should skip the sustain phase completely, and start reversing the volume back to 0 from the point it was currently at:
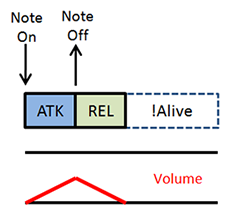 Special Case
Conclusions
And that’s all for today! I hope you enjoyed the series, and feel free to leave any questions or suggestions in the comments section below. As usual, I’ll end the article with a video sample and the source code for you to compile and play around with. Until next time!
Note: You can disregard the Piano class. It’s just a hack I threw together to render a simple piano keyboard procedurally.