Pathfinding on a 2D Polygonal Map
I haven’t had much time to update the blog lately (mostly due to having to crunch work on my thesis) and for that I apologize. But since it’s been one month since my last post, I decided to write something up today, even if it’s not a full blown article with source code like my previous posts.
So, here’s the deal! I’ve been working on 2D point-and-click graphic adventure game engine and editor lately, and what I’d like to share today is the general idea of how I ended up implementing the pathfinding for my engine.
If you’ve never seen a 2D point-and-click graphic adventure game, it’s a game genre that used to be really popular during the 90s. I think this video sums it all up (literally):
So, in most point-and-click graphic adventure games, whenever you click on the screen, your character tries to get as close as he can to that location, while evading all the obstacles along the way. But unlike a tile-based game where the walkable areas are easily represented by a regular grid, the floor on a graphic adventure game can have virtually any arbitrary shape.
In the old days (in the golden era of LucasArts and the SCUMM) they would often represent the walkable areas as a set of walk boxes, which were really nothing more than simple horizontal trapezoids laid down to cover the entire floor area. A pre-processing stage would then calculate the shortest path between each and every walk box, and store the results in a matrix, so they could simply be looked up at runtime (which traded an higher memory footprint for increased performance).
Nowadays, computers have become so advanced that it’s not really necessary to do this - we can simply run the pathfinding in realtime and be done with it. And as for the floor representation, I wanted something that would be easier to define in my editor than trying to manually cover the floor with individual trapezoids. I wanted the user to be able to simply draw any shape he wanted, no matter how complex, and have the character automatically know how to navigate it!
So here’s a video of what I came up with:
Algorithm
The pathfinding algorithm used in the video is really just a regular A*. I recommend this resource to learn how to implement it in C#, and what I used is pretty much just a direct translation from the method described there! What’s more special here is how the graph is created, which is what enables us to walk all over the surface of the polygon without ever leaving it, and always finding the shortest route possible. So, here’s the process needed to create the graph:
- First, create a graph node for each concave vertex of the polygon. If the polygon has holes, then you should also include the convex vertices of the hole polygons.
- Run a line-of-sight algorithm between each pair of graph nodes and link those which are in direct line-of-sight from each other.
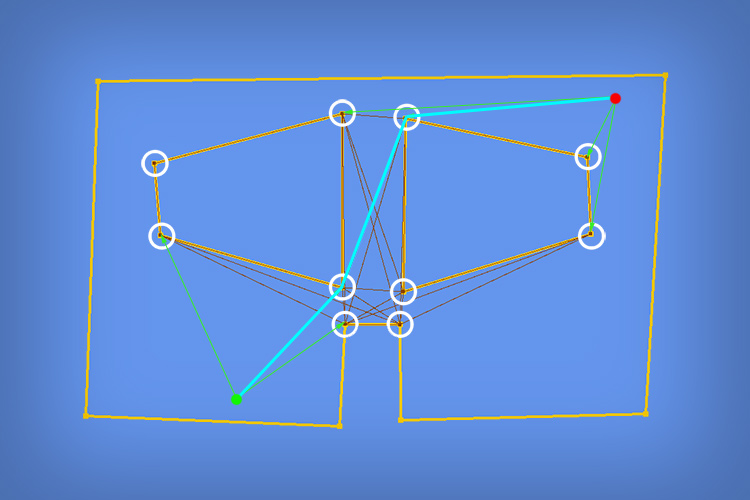
As an example, here’s a simpler polygon than the one in the video. I’ve marked all the concave vertices with a circle, and you can also see the connections between each of them. This is all you need to be able to walk over the polygon!

This sort of graph is usually referred to as a visibility graph, and because of that, the pathfinding method I used is also known as points-of-visibility pathfinding. You can read more about it in the first two Game Programming Gems books, on the articles “The Basics of A* for Path Planning” and “Expanded Geometry for Points-of-Visibility Pathfinding” respectively. The graph could still be optimized to remove a lot of redundant edges that will never be needed to move around obstacles, but I left that for a later stage since I’m not running into any performance issues at the moment.
With your graph structure created, you can apply the A* algorithm over it by following these steps:
- First verify if both the start and end points of the path are inside the polygon. If the end point is outside the polygon you can optionally clamp it back inside.
- Then start by checking if both points are in line-of-sight. If they are, there’s no need for pathfinding, just walk there!
- Otherwise, add the start and end points of your path as new temporary nodes to the graph.
- Connect them to every other node that they can see on the graph.
- Run your A* implementation on the graph to get your path. This path is guaranteed to be as direct as possible!
- Finally, remove the two temporary nodes from the graph.
Taking the graph from earlier, this process could be represented as something like:
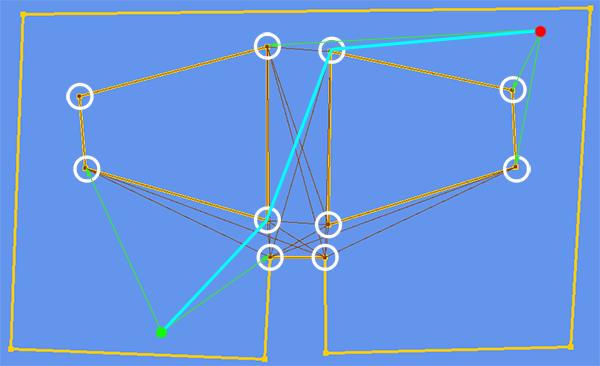
Where the red and green dots are the start and end nodes which have been added to the graph, and linked to every other node they can see (the green lines). Then a path is taken from this new graph (the light blue line).
Code Snippets
I don’t have a full sample that I can share at this moment, but I’ll describe two of the most tricky parts of the process. Hopefully you can figure out the rest from the references I gave above.
One essential part of the process is knowing if two points inside a polygon are in line of sight or not. In order to do that, I run a line segment intersection test between the line segment formed by both nodes, and all edges of the polygon. If both nodes are in line-of-sight, then the test should return false. It’s not very efficient since I compare against all edges of the polygon, but it gets the work done. Heres the helper method I use for the line segment intersection test:
public static bool LineSegmentsCross(Vector2 a, Vector2 b, Vector2 c, Vector2 d)
{
    float denominator = ((b.X - a.X) * (d.Y - c.Y)) - ((b.Y - a.Y) * (d.X - c.X));

    if (denominator == 0)
    {
        return false;
    }

    float numerator1 = ((a.Y - c.Y) * (d.X - c.X)) - ((a.X - c.X) * (d.Y - c.Y));

    float numerator2 = ((a.Y - c.Y) * (b.X - a.X)) - ((a.X - c.X) * (b.Y - a.Y));

    if (numerator1 == 0 || numerator2 == 0)
    {
        return false;
    }

    float r = numerator1 / denominator;
    float s = numerator2 / denominator;

    return (r > 0 && r < 1) && (s > 0 && s < 1);
}
The other important point is to know whether a vertex in a polygon is convex or not. I use the following method for this (remember, if the polygon you’re testing is a hole, then you should invert the result):
public static bool IsVertexConcave(IList<Vector2> vertices, int vertex)
{
    Vector2 current = vertices[vertex];
    Vector2 next = vertices[(vertex + 1) % vertices.Count];
    Vector2 previous = vertices[vertex == 0 ? vertices.Count - 1 : vertex - 1];

    Vector2 left = new Vector2(current.X - previous.X, current.Y - previous.Y);
    Vector2 right = new Vector2(next.X - current.X, next.Y - current.Y);

    float cross = (left.X * right.Y) - (left.Y * right.X);

    return cross < 0;
}
To check if a point inside a polygon I used the following method which has some extra code added for tolerance near the edges:
public static bool Inside(IList<Vector2> polygon, Vector2 position, bool toleranceOnOutside = true)
{
    Vector2 point = position;

    const float epsilon = 0.5f;

    bool inside = false;

    // Must have 3 or more edges
    if (polygon.Count < 3) return false;

    Vector2 oldPoint = polygon[polygon.Count - 1];
    float oldSqDist = Vector2.DistanceSquared(oldPoint, point);

    for (int i = 0; i < polygon.Count; i++)
    {
        Vector2 newPoint = polygon[i];
        float newSqDist = Vector2.DistanceSquared(newPoint, point);

        if (oldSqDist + newSqDist + 2.0f * System.Math.Sqrt(oldSqDist * newSqDist) - Vector2.DistanceSquared(newPoint, oldPoint) < epsilon)
            return toleranceOnOutside;

        Vector2 left;
        Vector2 right;
        if (newPoint.X > oldPoint.X)
        {
            left = oldPoint;
            right = newPoint;
        }
        else
        {
            left = newPoint;
            right = oldPoint;
        }

        if (left.X < point.X && point.X <= right.X && (point.Y - left.Y) * (right.X - left.X) < (right.Y - left.Y) * (point.X - left.X))
            inside = !inside;

        oldPoint = newPoint;
        oldSqDist = newSqDist;
    }

    return inside;
}
And to check for line of sight between two points inside the polygon, it was basically this:
bool InLineOfSight(Polygon polygon, Vector2 start, Vector2 end)
{
  // Not in LOS if any of the ends is outside the polygon
  if (!polygon.Inside(start) || !polygon.Inside(end)) return false;

  // In LOS if it's the same start and end location
  if (Vector2.Distance(start, end) < epsilon) return true;

  // Not in LOS if any edge is intersected by the start-end line segment
  foreach (var vertices in polygon) {
    var n = vertices.Count;
    for (int i = 0; j < n; i++)
      if (LineSegmentsCross(start, end, vertices[i], vertices[(i+1)%n]))
        return false;
  }

  // Finally the middle point in the segment determines if in LOS or not
  return polygon.Inside((start + end) / 2f);
}
Finally, you might have noticed how in the video I was joining and subtracting polygons from each other while drawing. This process was made easy due to a library called Clipper (which you can get here). It’s pretty easy to use! What I’m doing is close to:
Clipper clipper = new Clipper();
clipper.AddPolygons(_fullPolygon, PolyType.ptSubject);
clipper.AddPolygon(_temporaryPolygon, PolyType.ptClip);
List<List<IntPoint>> solution = new List<List<IntPoint>>();
clipper.Execute(ClipType.ctUnion, solution, PolyFillType.pftEvenOdd, PolyFillType.pftEvenOdd));
_temporaryPolygon.Clear();
_fullPolygon = solution;
And that’s all for today, I hope you enjoyed it. I don’t have any source code at this time, since this is still coupled with my game engine, but I might get to it sometime in the future when I have more time. Until then!